Is your concrete looking tired, cracked, or just plain boring? Good news resurfacing is way less hassle (and less expensive) than totally replacing your slab. Whether it’s your driveway, patio, or basement floor, you can bring it back to life with the right steps. Let’s walk through it together!
Step 1: Assess the Damage
Take a Good Look:
– Walk the area and note down:
– Cracks (Are they hairline or wide? Stable or spreading?)
– Spalling (Are there flaky, chipped spots?)
– Delamination (Is the top layer peeling off?)
– Scaling (Is the surface pitted and rough?)
– Any signs of moisture (Damp spots, white residue, etc.)
Quick Tips:
– Small, tight cracks? You can probably resurface!
– Big, growing cracks or deep damage? You might need more serious repairs or even a replacement. If you’re considering updating your surfaces, check out this helpful concrete resurfacing guide for more details.
Think About:
– How much foot traffic or weather will this get?
– Any special use? (Garage, pool deck, etc.)
– Your style and budget goals.
Step 2: Prepping the Surface (Don’t Skip This!)
You’ll Need To:
– Sweep and vacuum up all dirt and debris.
– Use a pressure washer if you need to blast off grime.
– Scrub oil spots with degreaser (no one wants stains coming through later).
– Dull glossy surfaces to help new material stick.
Fix What’s Broken:
– Fill cracks and chips with repair compound.
– Level out any uneven patches.
– Only prime if your product says to!
Safety First:
– Goggles, gloves, and a dust mask are a must.
– Ventilate if you’re indoors.
Step 3: Pick Your Overlay
Here are your main choices:
- Slurry Overlay
– Good for filling little pits and smoothing things out.
– Super thin great as a base.
- Micro-Top Overlay
– Thin but tough.
– Perfect for high-traffic areas.
- Polymer-Modified Overlay
– Extra sticky and flexible works well on tricky surfaces.
How to Choose?
– Consider traffic, weather, and your favorite finish.
– Go with a method (trowel, squeegee, or pump) that matches your skill and the job size.
Step 4: Add Some Color
Want to jazz it up? Try these:
– Integral stains (mixed in): Long-lasting, won’t wear away.
– Acid stains: Reacts with minerals for a cool, marbled look each slab is one-of-a-kind.
How-To:
– Always test in a small spot first.
– Apply to a clean, dry surface.
– Seal it up to lock in the color.
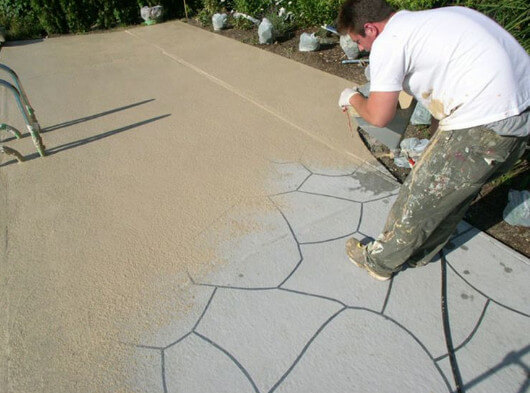
Step 5: Get Creative with Patterns & Texture
Decorative Ideas:
– Use stamps for brick, stone, or custom designs.
– Plan your layout (draw it out!).
– Press stamps while the overlay is still wet don’t overdo it, or you’ll blur the details.
– Seal when you’re happy.
Pro Tip: Use contrasts (like a border) for extra flair.
Step 6: Safety & Slip Resistance
Keep It Safe:
– Choose a slip-resistant finish, especially for outdoor or wet areas.
– Test texture samples before going big.
– Clean and prep the old surface well slippery spots are a hazard.
Don’t Forget PPE:
– Non-slip boots, gloves, goggles, and a dust mask.
– Ear protection for loud tools.
– First-aid kit nearby just in case!
Step 7: Drying, Durability & Maintenance
Drying Times:
– Usually, 24–72 hours for foot traffic (longer for cars).
– Don’t rush patience prevents cracks!
For Durability:
– Prep right, cure right, and keep the surface clean while drying.
– Protect from rain, wind, and direct sun during curing.
Easy Maintenance:
– Sweep regularly.
– Reseal as needed.
– Tackle chips or stains quickly.
Budget Tips
– Prioritize: Focus on the highest-impact areas first.
– Compare Materials: Don’t just buy the cheapest balance price and quality.
– Buy Smart: Ask about discounts, buy in bulk, and use concentrated products.
– DIY When Possible: But know your limits!
Tool Checklist
– Power mixer or drill with a mixing paddle
– Trowel, gauge rake, squeegee
– Buckets, stiff brush, shop vac
– Knee pads (your joints will thank you)
– PPE (goggles, gloves, mask)
– Clean-up gear
Mistakes to Avoid
– Skipping Prep: Don’t just sweep and go clean, repair, and check moisture!
– Uneven Color: Measure pigments by weight, not guessing.
– Bad Timing: Seal when the concrete is dry not too soon or you’ll trap moisture.
– Ignoring Safety: Always use the right protective gear.
That’s It!
Concrete resurfacing is totally doable for most DIYers with some patience and planning. Break the job into steps, don’t skimp on prep, and you’ll have a surface that looks awesome and holds up for years. Good luck and have fun giving your concrete a second chance!